Wednesday, October 28, 2009
PORTABLE DOCUMENT FORMAT files
Attributes of PDF files:
• Resolution-Independent
(like vector-uses path)
• Compressed
• Contains all the information-text, fonts, images, graphics, links...
• Free Distribution of Acrobat Reader
• Set a variety of end-user restrictions.
• Open Standard-Royalty Free
Uses:
Printing (standard printing format)
Web Viewing
Limitations:
Difficult to Edit (but not impossible)
Large file sizes

SAVING FILES AS PDFs
1) Saving Adobe Doc or Word Doc:
a) It is easy to save Adobe File as a PDF: Simply go to File>SaveAs and in the format drop down menu choose Adobe PDF. (Remember to change the name if you want to keep your original as an .ai or a psd. Otherwise it will override your original file)
b) For InDesign go to File/PDF Presets
c)For a Word Doc, go to File/Print and the Bottom Left of the Window, Click PDF/SaveAsPDF
2) Saving Photoshop and Illustrator Layers in a PDF: This is also simple to do. With all the layers visible choose File/SaveAs and in the format drop down menu choose Adobe PDF and click save. Another menu will come up. In the Adobe Version Menu choose Adobe Reader 7.0 (this version allows you to save layers while older ones do not) (The pages section of this document will be muddled if the layers were not for one image.)
3) Saving Photoshop and Illustrator Layers as pages in One PDF file. This is a little more difficult to do, but will give you the best results when wanting to display several images that exist in one file as pages in a PDF.
a. Open the original file and make visible the first layer that you want to be page 1.
b. Save the .pdf open in Acrobat Reader with a new name
4) Saving Multiple Files as pages in One PDF file.
There is a great video tutorial on the CS3 Online Tutorial Site-look under Adobe Acrobat.
a) It is easy to save Adobe File as a PDF: Simply go to File>SaveAs and in the format drop down menu choose Adobe PDF. (Remember to change the name if you want to keep your original as an .ai or a psd. Otherwise it will override your original file)
b) For InDesign go to File/PDF Presets
c)For a Word Doc, go to File/Print and the Bottom Left of the Window, Click PDF/SaveAsPDF
2) Saving Photoshop and Illustrator Layers in a PDF: This is also simple to do. With all the layers visible choose File/SaveAs and in the format drop down menu choose Adobe PDF and click save. Another menu will come up. In the Adobe Version Menu choose Adobe Reader 7.0 (this version allows you to save layers while older ones do not) (The pages section of this document will be muddled if the layers were not for one image.)
3) Saving Photoshop and Illustrator Layers as pages in One PDF file. This is a little more difficult to do, but will give you the best results when wanting to display several images that exist in one file as pages in a PDF.
a. Open the original file and make visible the first layer that you want to be page 1.
- Save the file as a PDF- File/SaveAs
- You do not need to change the name (See above for saving one image)
- In the “Save Adobe PDF” Window, Check, Embed “Page Thumbnails” and “View PDF after saving”.
- Click Save as PDF.
b. Save the .pdf open in Acrobat Reader with a new name
- Click on the .pdf open in Acrobat Reader
- Click File/Saveas and change the name of the file
- At the left of this PDF, click the pages tab. You should see the visible layer saved as a page from your file.
- Click on this page icon, to highlight it
- Now toggle back (F9) to the .pdf open in the original application and choose the next layer from page 2
- click File/ Save ( S)
- Toggle back to the new PDF open in adobe reader and with page 1 highlighted
- Go to Document>InsertPages
- Choose the original file with the new visible layer saved
- Click open and ok. Page two should appear.
4) Saving Multiple Files as pages in One PDF file.
There is a great video tutorial on the CS3 Online Tutorial Site-look under Adobe Acrobat.
CHANGING A BITMAP IMAGE TO A VECTOR GRAPHIC
PLACE
First place your image in your AI document by clicking:
File/Place, locate the image, highlight it * and click Place.
*Make sure the link option in the place window is unclicked. (if the link is clicked, your image will NOT be imbedded into the file and when you move the file the image will not move with you.)

SCALE
If necessary, scale the image to fit within the parameters of the art board.
Object/Transform/Scale

LIVE TRACE
Now Open up your control panel (it may already be open) Window/Control
In the middle of the control panel there is a button named, Live Trace. (remember the image must be selected to see the control panel option for it.) To the right of the Live Trace button, click the down arrow key and choose Low or High Fidelity Photo. (depending on how much detail you want will determine whether you choose low or high.)

ENLARGE
With your navigator tool, enlarge the image. You will notice that it is no longer pixelated, rather the colors are separated into shapes. This is your indicator that the image is now a vector graphic.
EXPAND/Ungroup
Now you are ready to expand and ungroup your image. With the image still selected, click the EXPAND button- at the right of the control panel. Once you have done this all the paths and anchor points for your shapes will appear.
Now go to Object/Ungroup to ungroup the paths.
 Once you have ungrouped the paths you can now manipulate them in anyway you want.
First place your image in your AI document by clicking:
File/Place, locate the image, highlight it * and click Place.
*Make sure the link option in the place window is unclicked. (if the link is clicked, your image will NOT be imbedded into the file and when you move the file the image will not move with you.)

SCALE
If necessary, scale the image to fit within the parameters of the art board.
Object/Transform/Scale

LIVE TRACE
Now Open up your control panel (it may already be open) Window/Control
In the middle of the control panel there is a button named, Live Trace. (remember the image must be selected to see the control panel option for it.) To the right of the Live Trace button, click the down arrow key and choose Low or High Fidelity Photo. (depending on how much detail you want will determine whether you choose low or high.)

ENLARGE
With your navigator tool, enlarge the image. You will notice that it is no longer pixelated, rather the colors are separated into shapes. This is your indicator that the image is now a vector graphic.
EXPAND/Ungroup
Now you are ready to expand and ungroup your image. With the image still selected, click the EXPAND button- at the right of the control panel. Once you have done this all the paths and anchor points for your shapes will appear.
Now go to Object/Ungroup to ungroup the paths.
 Once you have ungrouped the paths you can now manipulate them in anyway you want.
REMOVING THE BACKGROUND FROM A TRACED BITMAP IMAGE
When you place and trace an image in illustrator, often this image will come with a background color, usually white. This is even the case, when you have gone to the trouble to select and delete the background in photoshop. The reason for this is that your photoshop file is set to have a background vs being set for transparency.
When this is the case you can go back and attempt to set the .psd file with a transparent background or you can remove it in illustrator. Here is how you remove it in illustrator:
Convert your Bitmap file to a Vector graphic, using Live Trace
(see the tutorial- Changing your Bitmap Image to a Vector Graphic)
Select the Background:
Using the Select Tool in the Top of the Tool, press down the Shift Key and select all the background ground closed paths (there may be more than one) Once the are all selteted hit delete.
Rasterize you Image
If you prefer to have the image back to its bitmap state, convert the graphic back to a Raster Image by selecting the image and choose Effect/Rastorize.
When this is the case you can go back and attempt to set the .psd file with a transparent background or you can remove it in illustrator. Here is how you remove it in illustrator:
Convert your Bitmap file to a Vector graphic, using Live Trace
(see the tutorial- Changing your Bitmap Image to a Vector Graphic)
Select the Background:
Using the Select Tool in the Top of the Tool, press down the Shift Key and select all the background ground closed paths (there may be more than one) Once the are all selteted hit delete.
Rasterize you Image
If you prefer to have the image back to its bitmap state, convert the graphic back to a Raster Image by selecting the image and choose Effect/Rastorize.
Digital Tools-Assignment 7: Image making with Live Trace.
This assignment is similar to the "AnythingGoes" Photoshop Assignment, in that you will be utilizing all the tools you have learned so far in illustrator to create an interesting, dynamic graphic image. It will also be an opportunity for you to further develop your point of view as it relates to your subject. The assignment requires that you do a little research too, in this way you will see what other people are saying about you topic. Your research should be guided by the perspective that has been developing while you have been visually exploring your topic.
Part 1 Research your topic on the web.
Part 2 Live Trace an Image (For help with Live Trace refer to the post:
"Changing a Bitmap Image to a Vector Graphic"
Part 3 Create a collage of your work. You collage should reflect something about your point of view that you are researching.
DUE Next Week
Post to Your Blog: (Remember to format for the web!!!)
POST to Server at THE END OF CLASS

Part 1 Research your topic on the web.
- Using the advanced google search, look for articles that seem to be of interest to you. Read through a couple of websites and pick an article(s) that you feel gives you new insights and builds on your interest in your subject.
- Post on your blog a description (in your words) of the article(s) you read, name the new insights you learned from reading this article(s).
- Include in your post links to the article(s), along with the title and author.
Part 2 Live Trace an Image (For help with Live Trace refer to the post:
"Changing a Bitmap Image to a Vector Graphic"
- Choose an image either of your own or an image off the web that relates to your topic. (remember in either case it must be a large file.
- Place this image in an illustrator file (remember to uncheck the link box.)
- Live Trace the image. You have the option of tracing it in any way you want, there are a lots of options to choose from. Look on the right of the Live Trace Button in the Control Panel. (Photo high/low fidelity will give you a trace most accurate to a photograph-though difficult to edit.)
- Once you have placed the image then Expand and Ungroup it, in order to edit the image.
- From here you can now use Live Paint to change the look of the image, as well as other tools you have practiced and learned in illustrator.
Part 3 Create a collage of your work. You collage should reflect something about your point of view that you are researching.
- Use the "Live Traced" image, and the edits you have made to it, the background for your collage.
- Go ahead and Place your logos and your sketched images in new layers. You will use these new layers to create a collage with your Live Traced/Live Paint image. This is the place to be really creative with opacity, transparency tools, gradients and so on:
- Use the opacity tool to create contrast,
- Use the affects to dramatize parts of your image.
- Rotate and skew parts to give a sense of motion.
- Create multiples and repeat parts to create a feeling of rhythm.
- Play with the intensity of colors to create a mood.
- Use text...etc...
DUE Next Week
Post to Your Blog: (Remember to format for the web!!!)
- A description of the article you read. (Include the link for the article.)
- A post of the original image you Live Traced (Include a link if this is not your image.)
- A post of the Live Traced version of the Original Image.
- DUE at the end of Class: A post of the collaged image you created in Illustrator, this will be used as the basis for you cover page for your final project.
POST to Server at THE END OF CLASS
1 pdf file with pages showing your four logos, our traced gradient illustraton and you collage.
Wednesday, October 21, 2009
Tuesday, October 20, 2009
BLOGS BLOGS BLOGS
BLOGS BLOGS BLOGS Here are some student blogs for you to browse through.
How can I decide?StoryCorpsDIY-Hacks Recycle/Reuse Healing NaturallyLove Not Violence Interactive Design Art of Balance PhillyGoGreen Macro Photography Save a Life. The Pickled Egg. Dating: this, that... The Wedding. NoChildLeftInside PostCardProject Are You Listening? DreamingParis. Running&theCouch. SAFARIS PropagandaHollywood. ASkiersDelight. BikePhilly. AmishIsWhatAmishDoes. TheCultureofTrash. EasternStatePenitentary. Tattoos. ForeverDreamers. DressforaWedding. Jewelery. ThingILiketoSee. PhillyTagged. GlamourSneaks. Octophant. PublicArt. CanineCandids. Trends. PILLY'sSTATUES LettheBeatGoOn CollegeDiets StatuesforYouandMe PeopleOut&AboutPhilly Mural&ABetterWorld RicksBlog MelissasBlog LeonasBlog JuliesBlog CourtneysBlog BerryTime TheTravelingBuddha CoffeeContact AnExtraterrestialMac TheWingedNeedle KittyWonder CrazyStitches Coconut SunFlowermenagerie TheCircumambulatingPencil SlenderTrunks SweatHeart DrunkenFelines PuttyMan TheWingedNeedle
How can I decide?StoryCorpsDIY-Hacks Recycle/Reuse Healing NaturallyLove Not Violence Interactive Design Art of Balance PhillyGoGreen Macro Photography Save a Life. The Pickled Egg. Dating: this, that... The Wedding. NoChildLeftInside PostCardProject Are You Listening? DreamingParis. Running&theCouch. SAFARIS PropagandaHollywood. ASkiersDelight. BikePhilly. AmishIsWhatAmishDoes. TheCultureofTrash. EasternStatePenitentary. Tattoos. ForeverDreamers. DressforaWedding. Jewelery. ThingILiketoSee. PhillyTagged. GlamourSneaks. Octophant. PublicArt. CanineCandids. Trends. PILLY'sSTATUES LettheBeatGoOn CollegeDiets StatuesforYouandMe PeopleOut&AboutPhilly Mural&ABetterWorld RicksBlog MelissasBlog LeonasBlog JuliesBlog CourtneysBlog BerryTime TheTravelingBuddha CoffeeContact AnExtraterrestialMac TheWingedNeedle KittyWonder CrazyStitches Coconut SunFlowermenagerie TheCircumambulatingPencil SlenderTrunks SweatHeart DrunkenFelines PuttyMan TheWingedNeedle
SCANNING TUTORIAL
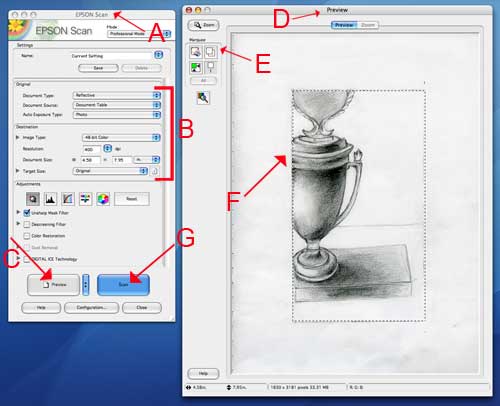
1. Open the Epson Scanner Application
- in the library, just click on the scanner icon in the dock
- in room 37 of the computer lab, open a finder window and go to "Applications", then EpsonScanner.app or in Photoshop go to File/Automate or Import/Epson Perfection
2. The Epson Scan window will open [FIGURE A] (the preview window may open to, just leave it).
3. Check your Settings [FIGURE B]: use the drop down menus to make your selections as follows:
Document type: Reflective (this is for your monitor screen)
Document Source: Document table
Auto Exposure Type: Photo
Image Type: 48-bit or 24-bit color
Resolution: Select your resolution anywhere at minimum 150 to 400 DPI (dots per inch) The more dots per inch, the larger the file size. If you need to use email to transfer the file, you will want to choose a smaller file size BUT you can do this later using the Save for Web function .
4. The remaining adjustments can be left untouched. (these options are available in photoshop)
5. Place your document on the scanner bed and close the lid.
6. Click the "Preview" button [FIGURE C]
7. The "Preview" window will open [FIGURE D] and the scanner will take a quick image of the document and display it here. If you need to reposition the document, do so now and hit "Preview" again.
8. Use the marquee tool [FIGURE E] to draw a selection [FIGURE F] around the portion of the document you want to scan. (This is similar to the crop tool in Photoshop) Everything inside the box will be scanned, everything outside of the box will not be scanned. You can adjust your selection by clicking and dragging the edge of the selection.
9. The Scan Button will become highlighted and then Click the "Scan" button [FIGURE G] to complete the scan.
10. A dialogue box will open asking you where you would like to save your scans and in what format. Navigate to your temporary folder created in the documents folder) Save your document as a JPEG (aka .JPG)
USING THE PEN TOOL- THE BASICS
The pen tool is one of the more difficult tools to master in illustrator, however it allows greater amount of possibilities to manipulate your path than you have without it. Below are some simple strokes to practice making. You can also refer to the adobe illustrator CS3 video tutoral workshop -see Illustrator/using the pen tool.


DIGITAL TOOLS ASSIGNMENT 6, Creating a Graphic Image from a Sketch
 The goal of this assignment is for you to be able practice using the pen tool, the add and subtract anchor point tools along with the gradient tool and the color picker. You will begin by scanning an image into the computer. This image will be one of your subject or something that relates to your subject. It also need to have been drawn by yourself. You will then trace the scanned image, my making "closed path" basic shapes" using the pen tool. Once traced you will spend some time filling in the illustration, giving it the illusion of three dimension through the use of, value, gradation and scale.
Mandi's Blog
1) Draw a sketch of your subject.
2) Scan your image using the Epson printer in the computer labs. See the post for getting help with Scanning Your Image. (Remember to save it as High Resolution (300-400dpi, TIFF)
3) Place the image in Illustrator.
go to File/Place to place an image
with the place window open remember to have the linked box unchecked.
4) In the layer that contains the sketch open up the top right layers folder and click template. This will lower the opacity of the image and will lock this layer.
5) In a new layer, trace your sketch using the pen tool 0r with the pencil tool/smooth tool. IMPORTANT: When tracing: you want to create closed paths. The easiest way to do this is to create a tracing that is made up of all shapes.
6) Once you have completed your tracing, Select the whole tracing (apple A) and copy it into a a new layer. Fill it in using the color picker and the gradient tool. Remember all your shapes must be closed paths, If you forgot to make closed paths you can always go back and use the join tool-see handout.
Due next week:
Post to your blog:
- the original sketch, scanned and saved for the web
- your tracing of the sketch (this will be a black and white illustration)
- your tracing of the sketch-filled in with color and gradations.
- and a colorful description of your final completed assignment.
- the original sketch, scanned saved as a tiff
- the illustrator file which will include 3 individual layers :
- 1) the placed original image.
- 2) the tracing of the sketch,
- 3) the tracing of the sketch filled in with color picker and gradations.
Wednesday, October 07, 2009
VECTOR VS RASTER GRAPHICS
Vector Graphics and Vector Shapes are made of vectors. They are mathematical objects that make up vector graphics.
Attributes:
Resolution-independent
Easily modified without losing clarity
Editing
Shapes and Paths are edited.
Limitations:
Lose subtle gradations of value and color
Vector Formats:
SVG and SWF-High quality image files with a low resolution.
They can be used for the web.
Raster or Bitmap Images are made up of pixels- a rectangular grid of picture elements.
Attributes:
Resolution-dependent, Able to represent subtle shades of value and color.
Editing
Individual pixels are edited
Limitations
Large amounts of file space. (May need to be compressed)
Raster Formats: GIF, JPEG, PNG, TIFF...etc
Attributes:
Resolution-independent
Easily modified without losing clarity
Editing
Shapes and Paths are edited.
Limitations:
Lose subtle gradations of value and color
Vector Formats:
SVG and SWF-High quality image files with a low resolution.
They can be used for the web.
Raster or Bitmap Images are made up of pixels- a rectangular grid of picture elements.
Attributes:
Resolution-dependent, Able to represent subtle shades of value and color.
Editing
Individual pixels are edited
Limitations
Large amounts of file space. (May need to be compressed)
Raster Formats: GIF, JPEG, PNG, TIFF...etc
SETTING UP A DOCUMENT IN ILLUSTRATOR

1) Open Illustrator (A window will automatically open, allowing you to choose what type of document to work with . CHOOSE A PRINT DOCUMENT) or close this window and open up a new file from the Menu Bar:File/New. Either way the document set up window will open. (see above)
a. Type a document name
b. Choose the size
c. Choose the orientation
d. Choose dimension units: use inches
d. Choose the color mode (always work in rgb. This is the mode the monitor uses.) To change the color mode MenuBar: File/Document Colormode
e. Click OK, (you can edit your document settings again once it is open by going to File/Document Setup.)

2) Open the commonly used Palletes in the Menu Bar: Window/...
f. Choose the Layers
g. The Navigator
h. The Stroke and The Swatches
3) Create Guides and Rulers for your Document
a. Make your ruler visible- Menu Bar: View/ShowRuler. Adjust the corner of your artboard to zero: click and hold the mouse at the left hand corner of the ruler and drag down to the left hand corner of the artboard.
b. Create your Guides: click and hold the mouse on the ruler and drag down the cursor a ¼ inch on each side and in the middle. (this will create a border to account for the print rolers
c. You can place other guides to custom fit the design of your document. Where you put the guides will all depend on what you using them for.
d. To move your guides go to MenuBar: View/Guides/LockGuides (uncheck this)
BASIC DRAWING TOOLS FOR ILLUSTRATOR
Below are the tools you will need to get started in Illustrator. These pages are taken from the Illustrator Help Tool Gallery. You can go to Adobe Help to print them.
(To view the images below in a larger format double click the image.)


(To view the images below in a larger format double click the image.)


FREE FONTS TO DOWNLOAD
When choosing fonts for your text, you may not be able to find a font you want in illustrator. You can try finding it online. There is a lot of great fonts to choose from. DA fonts allows you to download a variety of fonts from their site.
When you download the fonts, it will be saved in the hardrive's font folder and will automatically save the fonts in the AdobeSuite programs. In some cases Adobe will not recognize that you downloaded the font and you may need to copy and paste the new font into the Adobe font folder yourself.
When you download the fonts, it will be saved in the hardrive's font folder and will automatically save the fonts in the AdobeSuite programs. In some cases Adobe will not recognize that you downloaded the font and you may need to copy and paste the new font into the Adobe font folder yourself.
DIGITAL TOOLS ASSIGNMENT 5, Logos with Images & Text!

Part 1
Image on left by RosesRoom
For this assignment you will be getting familiar with the basic shapes tools in illustrator by creating simple logo icons and logo text for the subject you have been up till now photographing.
1) Remember to review the class blog tutorial on Setting up an Illustrator Document
2) Review the Online Video Tutorials in Illustrator:
- "Saving files for the Web."
- "Creating type on a path."
- "Using the line, eraser and shape tool."
- "Selecting and Manipulating Objects."
Then go ahead and review the Drawing Tools, they will be helpful when working with basic shapes.
3) And don't forget using Illustrator Help is another way to get assistance with using the program. for example:
- Expanding symbols: manipulate them can be found in: Help/Drawing/Symbols/Work with Symbol Instants/Modify a Symbol Instant (Remember you will need to go to Object/Ungroup to separate out the shapes. Sometimes you have to repeat this several times.)
Part 2: CREATE YOUR OWN LOGO
The method and process for creating images and manipulating them in illustrator can be compared with cutting and pasting color paper to build and image vs photoshop which can be compared with painting which creates an images through subtle gradations.
1) To become familiar with the process of building an image, egin this assignment by creating an image of your subject using the color paper. This will help you understand how creating an image with basic shapes in illustrator works.
- Scan this paper project and post it on your blog. (See the blog post for "Scanning Images")
2) Now open one illustrator document. You will use this one document for all four Logos. Each logo will be created in separate layers .
- a) In the "new document window" choose “letter” for the size of the paper and the "vertical placement".
2) Using the Basic Shape Tools, create four different variations of a "logo picture" that symbolically represent your topic (Your logo should be an abstract design or simplified illustration. It should not be text. (think the nike and the apple logo). You logo image should also relate to the images you have been creating in photoshop.
Here are a few student's logos:
This is Basma's logo.


This is Kelly's Logo
Reminder:
- You can use google image search: type in logos or logo icons for ideas
- IMPORTANT: Each logo should be placed in a separate layer, in your one document.
Part 3: DESIGNING a TEXT Logo with FONT STYLES.
1) Based on the point of view you have been developing around your subject and considering the logos style you have created with your "logo icons", design four titles to go with your logo icon.
This is Angelina's text logo

This is Kaysia's text logo

Reminder:
- Choose 1-2 font styles to work with. If you cannot find a font that will work for you. You can download fonts from DAFonts.
- Remember Expanding and Ungrouping the test will give you more freedom to edit the text.
- You can do a google image search: type in "logos text" for ideas
- Each title should be placed in a separate layers, in your one document with your logos.
Due Next Week:
1) Post your color paper project and all 4 versions of your logo icons and logo titles to your blog.
- a. You will need to save each layer containing each logo as a jpeg or gif using the save for the web option. Do this by making the layer you want visible and all the other layers invisible.
- b. Both the logos and the title should have a description about the concept behind design you chose.
Subscribe to:
Posts (Atom)