 1. Open Photoshop
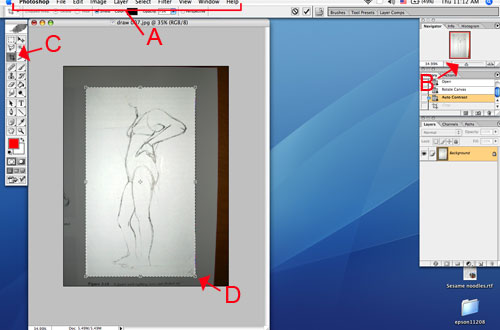
2. Open your JPEG in Photoshop by going to the Menu [FIGURE A] - to "File" - "Open with" or using the keystroke apple "O". Navigate to your image and open it.
3. Set up your workspace to have the navigator open - On the Menu [FIGURE A], go to "Window" - "Navigator". If there is already a check-mark next to it then it is already there. The navigator provides a small slider [FIGURE B] that scales your image on the screen to a workable size.
(This is preferable to using the zoom tool, since you will not have to toggle back and forth between tools, when using the navigator)
4. You may need to rotate your image to the right position (perhaps you scanned it upside down). On the Menu [FIGURE A], go to Image/Rotate Canvas and pick from the options. 180 to turn it right-side-up. 90 clockwise (CW) or counter-clockwise (CCW) to turn on its side.
5. Next you will want to use your crop tool [FIGURE C] to cut away any part of the scan that you do not want. The crop tool is located in the tool palette and looks like a square with a diagonal line through it.

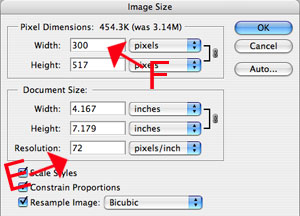
8. To change the size of your image go to the Menu Bar/Image/Image Size
9. The "Image Size" dialog box will open. Depending on what you will be using the image for will depend if you will be changing the resolution. [FIGURE E] (72 is the standard dpi for any image that lives online, 300dpi is considered a standard high res. image). Next change the width of your image to fit the column of you blog (300 - 500 pixels) [FIGURE F] or for a website. If for print set it to the size paper you will be using to print with.
NOTE: It is acceptable practice to low the resolution of an image, but increasing the resolution is not. Photoshop has to literally "make-up" pixels that do not exist. NEVER WORK OF YOUR ORIGINAL, rather save a copy and work from the copy.
10. After the image is re-size it will look smaller on your screen. Use the slider [FIGURE B]in the navigator to bump up the image size on your screen.

No comments:
Post a Comment