Wednesday, September 16, 2009

COLOR THEORY & MANAGING FOR PRINT


The ABC’s of Color Theory & Color Management


The Primary Colors

  • Red
  • Green
  • Blue
  • Cyan
  • Yellow
  • Magenta
  • (K)

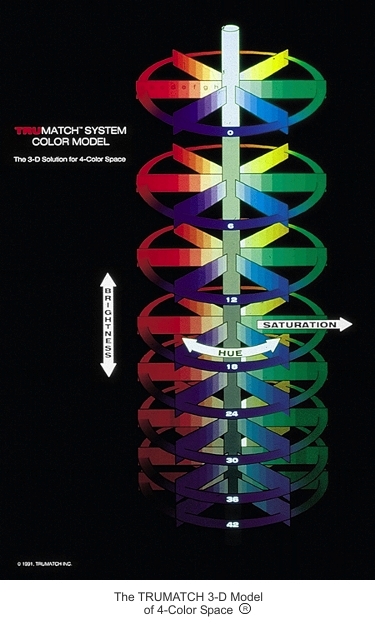
The 3 Dimensions of Color

  • Hue-The Color
  • Saturation-The Intensity
  • Brightness-Value-Light/Dark


A Three Dimensional Color Wheel


the TRUE MATCH COLOR WHEEL

3 Factors in Managing Color:


The Image

The Paper

The Printer


The Image

Adjusting the color quality of the image.


a. Adjust directly:
i. on site with your camera


b. Adjust indirectly:
i. from the menu bar: image/adjustment
ii. or in the layers pallete with an adjustment layer.


The Paper

Change the paper type you are using

Glossy vs Matte…


The Printer

Adjustments to your printer


Clean the heads

Calibrate your printer to the monitor

Change printers

Fill the ink


CS3 “Print” Window

Synchronizes

The image---The paper---The printer

&

Soft Proofs

3 Factors in Managing Color:


1) The image

2) The paper

3) The printer


1) Adjusting the color quality of a printed image.

a. Adjust directly: menu bar: image/adjustment/…

b. Adjust indirectly as an adjustment layer.


2) Change the paper type you are using

a. Glossy vs Matte…
  • (A common inkjet printer paper is the Epson Matte-Heavyweight)

3) Adjustments to your printer

a. Clean the heads
  • (run a test first)

b. Calibrate your printer to the monitor
  • (Custom Color Profiles)

c. Change printers


CS3 PRINT WINDOW

Synchronizes: 1) The image. 2) The paper 3) The printer

Soft Proofing

for more info on Color Management

POSTING LINKS TO BLOG POSTS


1) Highlight the text you want the links to be attached too (FIG A)

2) Tab over to the website on your web browser and Copy and Paste the URL address
into the Link Window (FIG C) and click OK.


3) Click on the link icon Linkjust above the text window (FIG B)

The highlighted text will show up as hyper-text, if posted correctly.

PHOTOGRAPHIC PAPER for the Epson Printer

The standard photographic paper for the Epson Printer used to be called Enhanced Matte Paper. The name has changed to:

Epson Ultra Premium Presentation Paper Matte (Enhanced).

Check out the Altex website in Florida for good prices and lots of choices.

There is also Staples, if you need paper right away.

SAVING ASSIGNMENTS TO THE SERVER V.2

Each time you arrive in class you will need to save your adobe projects onto the server.

(The information on the server is erased every monday, therefore, the server is not a replacement for your dropsend or thumbdrive acc.)

HERE IS HOW YOU DO IT:

1. Go to Finder/Go/Connect to server.
2. Type in: 10.10.10.172
3. Sign is as a guest.
4. Create a folder with your name on it ei: "Lena Helen". Folders are in alphabetical order.
5. Click and drag your finished assignments into the folder before the end of class. (Uploading can only be done on Campus.)


ONLINE CS3 TUTORIALS

CS3 Suite. has online video tutorals . At any time you can go to this site to re-familiarize yourself with the tools and commands we are covering.

OVERVIEW OF SELECTION TOOLS IN PHOTOSHOP


OVERVIEW OF THE LAYERS PALLETE


The layers palette can be found in the Menu Bar under Window/Layers

Like the navigator tool the layers palette is an essential organizing tool for many of the the Creative Suite Programs.

Below is a diagram of the Layers pallet and corresponding labels for the buttons:


FIG. A: The background layer is your original layer when you open an image. You can initially unlock the layer by double clicking and renaming it. This layer is highlighted meaning you can edited the layer once it is renamed


FIG. B: An empty layer is indicated by a grey and white grid, to the left of the layer. You can move a layer by highlighting it: click, hold and drag it over or under another layer

FIG. C: The eye icon indicates that the layer is visible. To make a layer invisible, click the eye and it will disappear. A layer must be visible and highlighted inorder to edit it.


FIG. D: The lock button locks a layer when it is highlighted.


FIG. E: The trash button is for deleting layers. Highlight: click, hold and drag a layer over the trash can to delete it.


FIG. F: The new layers button creates new and empty layers. To make a copy of a layer, highlight the layer and click, hold and drag it over the new layers button.


FIG. G: The group button allows you to make folders. The is good for organizing your layers into groups.


FIG. H: The links button allows you to link layers together. To link layers you must have the layers highlighted: hold down the shift key to highlight more than one layer.


FIG I: The layers menu button show you more options and commands for the layers palette


FIG J: The opacity button allows you to adjust the opacity of a layer.


SETTING BACKGROUND COLOR IN PHOTOSHOP

You have the option of setting the background color on a Photoshop file when you first create a new file.

When you go to FILE/NEW there is an option to set the background content - to white, background color or transparency. In most cases you will want to choose transparency. PS will "remember" this setting for the files opened after that.

Also, if you need to delete a background color, once you have opened a file you can just select it (apple/a) and cut the object out of the layer.

DIGITAL TOOLS ASSIGNMENT 3 Playing with Reality


Image by Jennifer B


The goal of this assignment is for you to practice using the selection tools, the free transform, the refine edge feature and the layers pallete. The assignment has two parts. The first part, asks you to change the background of an image. The second part, asks you to select and create multiple copies of one image and place in such a way to create the illusion of perspective. You will be using the images you have taken so far for this class to complete the assignment. The finished assignments should also give us some insight into your topic as it interests you.

PART 1 Review the tutorials

a.
Review the class blog posts on Layers and Selection Tools .

b. Check out the CS3 Video Tutorials. Choose the product, Photoshop CS3 and watch, "Making and Refining Selections" and "Using Layers"(It is good to have headsets when listening in the labs.)

c. Review the the “2 minute Video” on using the Extraction Tool (#3) The Video on Depth of Field (2MPT #39 ) This video uses the extract tool and shows you how to create depth of field for a background, using the clone tool (for removing halo’s around your image) and the blur tool on the background.


PART 2 THE TWO PHOTOSHOP ASSIGNMENTS

1) CHANGE THE BACKGROUND OF AN IMAGE
.

a. Choose one of your images that you have taken of you subject from last week. Make sure you can select out of the image your subject without too much difficulty. (For example: a lightly colored coffee with a background that is darker in value, would be easy to select.) Save the image using the Save As option, Rename it: Yourname_BackgroundAssignment.psd

b.
Now select the object from the image and remove the background. Use the Extract Tool or any of the Selections Tools to accomplish this.
(See “Selection Tools” for a list of options and helpful hints)
(Remember to use the Select/Inverse tool if you originally select the object and you want to inverse the selection to select the background to delete it.) Now delete the background from your image. You will be replacing it with an entirely new image or object. See below:

d. Choose and open another image to use as a background for your object above. Copy and Paste the background into a new layer in the file where the object exists.
  • Remember the layer containing your new background needs to be below the layer containing the object.
  • Remember the new background should emphasis your interest in your subject, giving the viewer a deeper understanding of your particular perspective.
e. You have the option to alter the place and scale of your object, once you have selected a new back ground. How your object is placed on the page will affect the composition and meaning of your new image.

Look at the image of the remote control with the the sunset for a background on RosesRoom's Blog. This is a good example of what I am looking for in the assignment.

2) CREATE THE ILLUSION OF PERSPECTIVE

a. Follow step a. in the above assignment. (This time naming your file:
Yourname_Perspective.psd)

b. Use a selection tool to select your object that best fits the character of the image, ie: if the object is similar in value then the magic wand might be appropriate to use. If the selection is not similar in value but has a distinct edge, then the magnetic lasso tool might work.


c. With the selection on, copy the object into another layer.


d.Make several copies of the object and then change the size, incrementally, using the free transform (Command/T) tool to create the illusion of perspective. (You can also play with blurring the object- use the filter/blur tool or decreasing the saturation image/adjustment/hue and saturation under the menu bar as the object recedes. Both can these tricks can help create the illusion of perspective.

e. Again consider how you place these images in relation to the background. How you place them will affect the overall feel of you image.

Note: Remember the object must be selected first before using free transform.

Note: You must click the apply button when using the free transform command or simply hit return.

e.
Once you are satisfied with the perspective design you have the option tochoose an entirely different image to place it on top of. Try and choose an image that will further communicate to us your interest in the topic.


Due next week:

Upload To Your Blog
The assignments formatted for the web and saved as a jpeg. Remember to use the "Save for Web" option in "File" on the Menu Bar.
  • Post these files with a description to your blog on how the new images relate to your interest in your object.

Before the beginning of class:

Upload to Dropsend
(and to your thumbdrive )2 .psd files (
saved with layers ) of both assignments. Do not flatten or merge you layers!!
  • These files MUST be saved with their layers. If the files are flattened into one layer, I will not be able to see the work you have done. And in this case, you will be asked to redo the project.
Download to your temp folder:
The 2 .psd files to your folder.
(This is the folder that you create in the documents folder at the beginning of class.)


Wednesday, September 09, 2009

Leopard OS X a guided tour

IMAGE FILE FORMATS Lecture


* Image Size/ Memory (kb, mb, gigs)
  1. Bytes (increases with the number of Pixels
  • 8bit file (256 colors)
  • 24 bit file (16 mil colors) “true color”
* Image Compression

  1. Lossless-compressed images without loss of original data. "Lossless data compression is a class of data compression algorithms that allows the exact original data to be reconstructed from the compressed data.
  2. Lossy-compressed with loss of original data (smaller) "A lossy compression method is one where compressing data and then decompressing it retrieves data that may well be different from the original"

Raster/bitmap, pixmap File Formats

  • JPEG (lossy)-8bit
  • PNG-8bit (lossless) improvement on the jpeg.
  • TIFF-(lossless) Printing Industry (not for web)
  • GIF(lossless)-8bit-used for animation and simple graphics on the web/
  • PNG-24 bit “true color” open source, good for editing pictures
  • RAW (lossless) smaller than tiff’s, used by photographers, not recognized by all editing software

Vector Format

SVG-all purpose vector graphic compatable with web applications

Adobe File Formats

.psd Photoshop
.ai Illustrator
.id Indesign
.pfd Portable File Document


Sources

Download: Server, Web
Upload: Scan- Print/Film-negatives and slides
Import: Camera/Camcorder
Create: Graphics Software- Adobe-PS, AI

MAC KEYBOARD SHORTCUTS

Basic Functions

F Keys

F9-shows all the windows that are open at once
F10-shows all the windows in the program that is in use
F11-pushes windows aside and makes the desktop available
F12 opens the dashboard

Command is also the Apple Keys

file menu

Command/n- open new document that is in use
Command/s- saves document that is in use
Command/p- prints document that is in use
Command/w- closes document
Command/tab will maximize the programs that are open. Press tab again to toggle between programs and press Q to quit a program.
edit menu

Com/a- highlight all text
Com/c- copy's highlighted text or image
Com/v-pastes highlighted text or image
Com/x- cut and places in clipboard text or image
Com/z- undo most recent command

window menu
Com/m- minimizes window and puts it on the doc.

format
Com/t (in text edit) and Com/d (in word doc)-open the fonts

extras

Com/0 fits image to screen
(but doesn’t change the size)
Com/+ or – increases and decreases image on screen

command+shift+3 = screen capture
command+shift+4 = highlights image and will save it as a jpeg file
shift+
command + t = will remove formating and convert a document into plain text
moving curser to bottom left - will turn screen save on

POSTING IMAGES TO BLOG POSTS

Posting images to your blog is easy! Once you have reformated your image for the web, (See this tutorial on how to do that: Save for Web Tutorial) You are now ready to post the image to your blog.

With the post window open, (See below image) simply click the image icon located on the right top side of the Compose Tab. (See Fig A)


Click the image icon and the image window will show up. (See below)
  • Click browse and a finder window will open, choose the image you would like to open and then click OPEN. (Remember to choose the image that you have reformatted for the web, do not choose the original image-this image will be larger than needed.)
  • Choose your layout and your Image Size (always choose large)
  • Click Upload. Blogger will let you know when uploading is completed, then click DONE, you can not check your post to see if your were successful

SETTING UP TO USE PHOTOSHOP

Getting the most out of your memory:

Mac’s are set up to use about 4G for your photoshop applications. If you do not have 4G of RAM you can allocate more memory by switching the scratch disk to HD. Here is how you do that:

  • Open PS
  • Go to Preferences/General/Performance
  • Check HD under Scratch Disk
  • Reserve atleast 50% RAM to PS
  • Relaunch PS (so that the changes will take affect)
(When you are finished working with Photoshop, adjust the settings back)


Opening an Image file in PS

  • From the DOCK double click the icon for PS
  • In PS, Click File/Open-in the menu bar (this will open the Finder)
  • Locate the folder that the image is located and highlight it, the Click Open
  • If asked: always convert to the working RGB and uncheck the imbedded profile.
  • Next Click File Save as/Rename your image (NEVER work off your original)
  • Save at the Maximum Quality for jpeg with Basiline Optimized.

THE PHOTOSHOP WORKSPACE

The work area consists of the following components:
A. Menu bar - the menu bar contains menus for performing tasks. The menus are organized by topic. For example, the Layers menu contains commands for working with layers.
B. Options bar – the options bar provides options for using a tool. (See Using the options bar.)
C. Toolbox - the toolbox holds tools for creating and editing images.
D. Palette well - the palette well helps you organize the palettes in your work area.
E. Palettes - palettes help you monitor and modify images.


The Options Bar
Most tools have options that are displayed in the options bar. The options bar is context sensitive and changes as different tools are selected. Some settings in the options bar are common to several tools (such as painting modes and opacity), and some are specific to one tool (such as the Auto Erase setting for the Pencil tool).
You can move the options bar anywhere in the work area using the gripper bar, and dock it at the top or bottom of the screen. Tool tips appear when you hold the pointer over a tool.

Click on the paint brush to see the options bar change. With the paint brush selected you get special options that effect only the paint brush – like opacity and brush size. Most tools come with special features to modify the behavior of the tool – look for them here in the options bar.

The Palettes
Palettes help you monitor and modify images. You can choose which palettes are visible. By default, palettes appear stacked together in groups. You can move palette groups, rearrange palettes in their groups, and remove palettes from groups.

- To display a palette menu, position the pointer on the triangle in the upper right corner of the palette, and press the mouse button.
- Some palettes, like History and Layers, have a series of buttons on the bottom of the palette – most importantly, the trash can.


The Toolbox


You select a tool by clicking its icon in the toolbox. A small triangle at the lower right of a tool icon indicates hidden tools. Positioning the pointer over a tool displays a tool tip with the tool's name and keyboard shortcut.

A. The marquee tools make rectangular, elliptical, single row, and single column selections.
B. The Move tool moves selections, layers, and guides.
C. The lasso tools make freehand, polygonal (straight-edged), and magnetic (snap-to) selections.
D. The Magic Wand tool selects similarly colored areas.
E. The Crop tool trims images.
F. The Slice tool creates slices.
G. The Slice Select tool selects slices.
H. The Healing Brush tool paints with a sample or pattern to repair imperfections in a image.
I. The Patch tool repairs imperfections in a selected area of an image using a sample or pattern.
J. The Color Replacement tool replaces a selected color with a new color.
K. The Brush tool paints brush strokes.
L. The Pencil tool paints hard-edged strokes.
M. The Clone Stamp tool paints with a sample of an image
N. The Pattern Stamp tool paints with part of an image as a pattern.
O. The History Brush tool paints a copy of the selected state or snapshot into the current image window.
P. The Art History brush tool paints with stylized strokes that simulate the look of different paint styles, using a selected state or snapshot.
Q. The Eraser tool erases pixels and restores parts of an image to a previously saved state.
R. The Background Eraser tool erases areas to transparency by dragging.
S. The Magic Eraser tool erases solid-colored areas to transparency with a single click.
T. The gradient tools create straight-line, radial, angle, reflected, and diamond blends between colors.
U. The Paint Bucket tool fills similarly colored areas with the foreground color.
V. The Blur tool blurs hard edges in an image.
W. The Sharpen tool sharpens soft edges in an image.
X. The Smudge tool smudges data in an image.
Y. The Dodge tool lightens areas in an image.
Z. The Burn tool darkens areas in an image.
AA. The Sponge tool changes the color saturation of an area.
BB. The path selection tools make shape or segment selections showing anchor points, direction lines, and direction points.
CC. The type tools create type on an image.
DD. The type mask tools create a selection in the shape of type.
EE. The pen tools* let you draw smooth-edged paths.
FF. The Custom Shape tool makes customized shapes selected from a custom shape list.
GG. The annotation tools make notes and audio annotations that can be attached to an image.
HH. The Eyedropper tool samples colors in an image.
II. The Measure tool measures distances, locations, and angles.
JJ. The Hand tool moves an image within its window.
KK. The Zoom tool magnifies and reduces the view of an image.
LL. Foreground and Background colors