To prepare your image to post on Blogger is to optimize it using the "Save for Web" option. Optimizing is a way to lower your file size while not degrading your image quality. This will save more space on your blogger account.
1. Open you image in photoshop.
2. Go to "File" - "Save for Web"
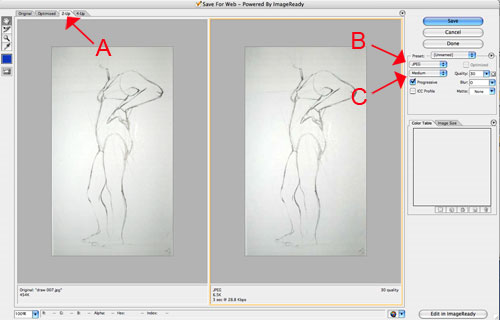
3. The "Save for Web" dialog box will open. Click on the tab "2-up" or "4-up" in the upper left hand corner [FIGURE A]. This will give you the original image on the left and the optimized version(s) on the right.
4. On the right hand size you will see some options. Use the drop-down menu on the left, to make sure you are saving your image as a "JPEG" [FIGURE B].
5. Use the next drop-down menu to choose the level of image quality [FIGURE C]. Try each option and watch how your image changes in the right hand window. Choose the image quality that is lowest, but still acceptable to your for image quality. Remember, the goal here is to obtain the lowest file size possible to save space. (Aim for around 12k if you can)
5a. If the Image is appearing larger than the window, this means you need to reduce the size of the image. On the right hand side of the the window, click the Tab: Image Size, change the size (for the blog 300-500ppi) and click Apply.
6. Looks good? SAVE!! and ReName-But remember not to use spaces in you file name. I also like to use the word "web" in it, so i know it is my web image. Save it in your images folder.
7. Post it on your weblog! (Remember when posting on the blog, choose large image (since you have already formatted it, making it smaller is unnecessary.)

1 comment:
This was definitely not as hard as you think. However, I haven't been able to design my blog so that my wonderful scanned image is the first thing you see. Does anyone know how to change the correct settings?
Thanks for any help you may have!
Post a Comment