Wednesday, October 21, 2009
Tuesday, October 20, 2009
BLOGS BLOGS BLOGS
BLOGS BLOGS BLOGS Here are some student blogs for you to browse through.
How can I decide?StoryCorpsDIY-Hacks Recycle/Reuse Healing NaturallyLove Not Violence Interactive Design Art of Balance PhillyGoGreen Macro Photography Save a Life. The Pickled Egg. Dating: this, that... The Wedding. NoChildLeftInside PostCardProject Are You Listening? DreamingParis. Running&theCouch. SAFARIS PropagandaHollywood. ASkiersDelight. BikePhilly. AmishIsWhatAmishDoes. TheCultureofTrash. EasternStatePenitentary. Tattoos. ForeverDreamers. DressforaWedding. Jewelery. ThingILiketoSee. PhillyTagged. GlamourSneaks. Octophant. PublicArt. CanineCandids. Trends. PILLY'sSTATUES LettheBeatGoOn CollegeDiets StatuesforYouandMe PeopleOut&AboutPhilly Mural&ABetterWorld RicksBlog MelissasBlog LeonasBlog JuliesBlog CourtneysBlog BerryTime TheTravelingBuddha CoffeeContact AnExtraterrestialMac TheWingedNeedle KittyWonder CrazyStitches Coconut SunFlowermenagerie TheCircumambulatingPencil SlenderTrunks SweatHeart DrunkenFelines PuttyMan TheWingedNeedle
How can I decide?StoryCorpsDIY-Hacks Recycle/Reuse Healing NaturallyLove Not Violence Interactive Design Art of Balance PhillyGoGreen Macro Photography Save a Life. The Pickled Egg. Dating: this, that... The Wedding. NoChildLeftInside PostCardProject Are You Listening? DreamingParis. Running&theCouch. SAFARIS PropagandaHollywood. ASkiersDelight. BikePhilly. AmishIsWhatAmishDoes. TheCultureofTrash. EasternStatePenitentary. Tattoos. ForeverDreamers. DressforaWedding. Jewelery. ThingILiketoSee. PhillyTagged. GlamourSneaks. Octophant. PublicArt. CanineCandids. Trends. PILLY'sSTATUES LettheBeatGoOn CollegeDiets StatuesforYouandMe PeopleOut&AboutPhilly Mural&ABetterWorld RicksBlog MelissasBlog LeonasBlog JuliesBlog CourtneysBlog BerryTime TheTravelingBuddha CoffeeContact AnExtraterrestialMac TheWingedNeedle KittyWonder CrazyStitches Coconut SunFlowermenagerie TheCircumambulatingPencil SlenderTrunks SweatHeart DrunkenFelines PuttyMan TheWingedNeedle
SCANNING TUTORIAL
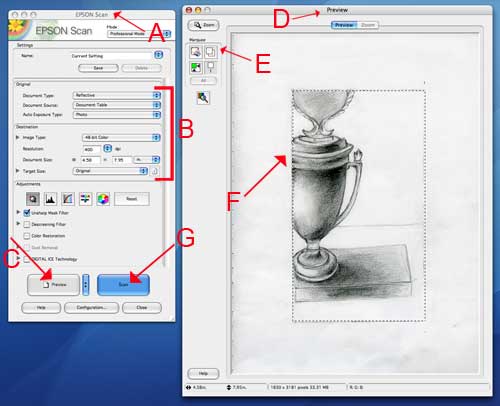
1. Open the Epson Scanner Application
- in the library, just click on the scanner icon in the dock
- in room 37 of the computer lab, open a finder window and go to "Applications", then EpsonScanner.app or in Photoshop go to File/Automate or Import/Epson Perfection
2. The Epson Scan window will open [FIGURE A] (the preview window may open to, just leave it).
3. Check your Settings [FIGURE B]: use the drop down menus to make your selections as follows:
Document type: Reflective (this is for your monitor screen)
Document Source: Document table
Auto Exposure Type: Photo
Image Type: 48-bit or 24-bit color
Resolution: Select your resolution anywhere at minimum 150 to 400 DPI (dots per inch) The more dots per inch, the larger the file size. If you need to use email to transfer the file, you will want to choose a smaller file size BUT you can do this later using the Save for Web function .
4. The remaining adjustments can be left untouched. (these options are available in photoshop)
5. Place your document on the scanner bed and close the lid.
6. Click the "Preview" button [FIGURE C]
7. The "Preview" window will open [FIGURE D] and the scanner will take a quick image of the document and display it here. If you need to reposition the document, do so now and hit "Preview" again.
8. Use the marquee tool [FIGURE E] to draw a selection [FIGURE F] around the portion of the document you want to scan. (This is similar to the crop tool in Photoshop) Everything inside the box will be scanned, everything outside of the box will not be scanned. You can adjust your selection by clicking and dragging the edge of the selection.
9. The Scan Button will become highlighted and then Click the "Scan" button [FIGURE G] to complete the scan.
10. A dialogue box will open asking you where you would like to save your scans and in what format. Navigate to your temporary folder created in the documents folder) Save your document as a JPEG (aka .JPG)
USING THE PEN TOOL- THE BASICS
The pen tool is one of the more difficult tools to master in illustrator, however it allows greater amount of possibilities to manipulate your path than you have without it. Below are some simple strokes to practice making. You can also refer to the adobe illustrator CS3 video tutoral workshop -see Illustrator/using the pen tool.


DIGITAL TOOLS ASSIGNMENT 6, Creating a Graphic Image from a Sketch
 The goal of this assignment is for you to be able practice using the pen tool, the add and subtract anchor point tools along with the gradient tool and the color picker. You will begin by scanning an image into the computer. This image will be one of your subject or something that relates to your subject. It also need to have been drawn by yourself. You will then trace the scanned image, my making "closed path" basic shapes" using the pen tool. Once traced you will spend some time filling in the illustration, giving it the illusion of three dimension through the use of, value, gradation and scale.
Mandi's Blog
1) Draw a sketch of your subject.
2) Scan your image using the Epson printer in the computer labs. See the post for getting help with Scanning Your Image. (Remember to save it as High Resolution (300-400dpi, TIFF)
3) Place the image in Illustrator.
go to File/Place to place an image
with the place window open remember to have the linked box unchecked.
4) In the layer that contains the sketch open up the top right layers folder and click template. This will lower the opacity of the image and will lock this layer.
5) In a new layer, trace your sketch using the pen tool 0r with the pencil tool/smooth tool. IMPORTANT: When tracing: you want to create closed paths. The easiest way to do this is to create a tracing that is made up of all shapes.
6) Once you have completed your tracing, Select the whole tracing (apple A) and copy it into a a new layer. Fill it in using the color picker and the gradient tool. Remember all your shapes must be closed paths, If you forgot to make closed paths you can always go back and use the join tool-see handout.
Due next week:
Post to your blog:
- the original sketch, scanned and saved for the web
- your tracing of the sketch (this will be a black and white illustration)
- your tracing of the sketch-filled in with color and gradations.
- and a colorful description of your final completed assignment.
- the original sketch, scanned saved as a tiff
- the illustrator file which will include 3 individual layers :
- 1) the placed original image.
- 2) the tracing of the sketch,
- 3) the tracing of the sketch filled in with color picker and gradations.
Subscribe to:
Comments (Atom)
