Wednesday, September 09, 2009
IMAGE FILE FORMATS Lecture
* Image Size/ Memory (kb, mb, gigs)
- Bytes (increases with the number of Pixels
- 8bit file (256 colors)
- 24 bit file (16 mil colors) “true color”
- Lossless-compressed images without loss of original data. "Lossless data compression is a class of data compression algorithms that allows the exact original data to be reconstructed from the compressed data.
- Lossy-compressed with loss of original data (smaller) "A lossy compression method is one where compressing data and then decompressing it retrieves data that may well be different from the original"
Raster/bitmap, pixmap File Formats
- JPEG (lossy)-8bit
- PNG-8bit (lossless) improvement on the jpeg.
- TIFF-(lossless) Printing Industry (not for web)
- GIF(lossless)-8bit-used for animation and simple graphics on the web/
- PNG-24 bit “true color” open source, good for editing pictures
- RAW (lossless) smaller than tiff’s, used by photographers, not recognized by all editing software
Vector Format
SVG-all purpose vector graphic compatable with web applications
Adobe File Formats
.psd Photoshop
.ai Illustrator
.id Indesign
.pfd Portable File Document
Sources
Download: Server, Web
Upload: Scan- Print/Film-negatives and slides
Import: Camera/Camcorder
Create: Graphics Software- Adobe-PS, AI
MAC KEYBOARD SHORTCUTS
Basic Functions
F Keys
F9-shows all the windows that are open at once
F10-shows all the windows in the program that is in use
F11-pushes windows aside and makes the desktop available
F12 opens the dashboard
Command is also the Apple Keys
file menu
Command/n- open new document that is in use
Command/s- saves document that is in use
Command/p- prints document that is in use
Command/w- closes document
Command/tab will maximize the programs that are open. Press tab again to toggle between programs and press Q to quit a program.
edit menu
Com/a- highlight all text
Com/c- copy's highlighted text or image
Com/v-pastes highlighted text or image
Com/x- cut and places in clipboard text or image
Com/z- undo most recent command
window menu
Com/m- minimizes window and puts it on the doc.
format
Com/t (in text edit) and Com/d (in word doc)-open the fonts
extras
Com/0 fits image to screen
(but doesn’t change the size)
Com/+ or – increases and decreases image on screen
command+shift+3 = screen capture
command+shift+4 = highlights image and will save it as a jpeg file
shift+command + t = will remove formating and convert a document into plain text
moving curser to bottom left - will turn screen save on
POSTING IMAGES TO BLOG POSTS
Posting images to your blog is easy! Once you have reformated your image for the web, (See this tutorial on how to do that: Save for Web Tutorial) You are now ready to post the image to your blog.
With the post window open, (See below image) simply click the image icon located on the right top side of the Compose Tab. (See Fig A)

Click the image icon and the image window will show up. (See below)

With the post window open, (See below image) simply click the image icon located on the right top side of the Compose Tab. (See Fig A)

Click the image icon and the image window will show up. (See below)
- Click browse and a finder window will open, choose the image you would like to open and then click OPEN. (Remember to choose the image that you have reformatted for the web, do not choose the original image-this image will be larger than needed.)
- Choose your layout and your Image Size (always choose large)
- Click Upload. Blogger will let you know when uploading is completed, then click DONE, you can not check your post to see if your were successful

SETTING UP TO USE PHOTOSHOP
Getting the most out of your memory:
Mac’s are set up to use about 4G for your photoshop applications. If you do not have 4G of RAM you can allocate more memory by switching the scratch disk to HD. Here is how you do that:
Opening an Image file in PS
Mac’s are set up to use about 4G for your photoshop applications. If you do not have 4G of RAM you can allocate more memory by switching the scratch disk to HD. Here is how you do that:
- Open PS
- Go to Preferences/General/Performance
- Check HD under Scratch Disk
- Reserve atleast 50% RAM to PS
- Relaunch PS (so that the changes will take affect)
Opening an Image file in PS
- From the DOCK double click the icon for PS
- In PS, Click File/Open-in the menu bar (this will open the Finder)
- Locate the folder that the image is located and highlight it, the Click Open
- If asked: always convert to the working RGB and uncheck the imbedded profile.
- Next Click File Save as/Rename your image (NEVER work off your original)
- Save at the Maximum Quality for jpeg with Basiline Optimized.
THE PHOTOSHOP WORKSPACE
The work area consists of the following components:
A. Menu bar - the menu bar contains menus for performing tasks. The menus are organized by topic. For example, the Layers menu contains commands for working with layers.
B. Options bar – the options bar provides options for using a tool. (See Using the options bar.)
C. Toolbox - the toolbox holds tools for creating and editing images.
D. Palette well - the palette well helps you organize the palettes in your work area.
E. Palettes - palettes help you monitor and modify images.

The Options Bar
Most tools have options that are displayed in the options bar. The options bar is context sensitive and changes as different tools are selected. Some settings in the options bar are common to several tools (such as painting modes and opacity), and some are specific to one tool (such as the Auto Erase setting for the Pencil tool).
You can move the options bar anywhere in the work area using the gripper bar, and dock it at the top or bottom of the screen. Tool tips appear when you hold the pointer over a tool.
Click on the paint brush to see the options bar change. With the paint brush selected you get special options that effect only the paint brush – like opacity and brush size. Most tools come with special features to modify the behavior of the tool – look for them here in the options bar.
The Palettes
Palettes help you monitor and modify images. You can choose which palettes are visible. By default, palettes appear stacked together in groups. You can move palette groups, rearrange palettes in their groups, and remove palettes from groups.
- To display a palette menu, position the pointer on the triangle in the upper right corner of the palette, and press the mouse button.
- Some palettes, like History and Layers, have a series of buttons on the bottom of the palette – most importantly, the trash can.
The Toolbox

You select a tool by clicking its icon in the toolbox. A small triangle at the lower right of a tool icon indicates hidden tools. Positioning the pointer over a tool displays a tool tip with the tool's name and keyboard shortcut.
A. The marquee tools make rectangular, elliptical, single row, and single column selections.
B. The Move tool moves selections, layers, and guides.
C. The lasso tools make freehand, polygonal (straight-edged), and magnetic (snap-to) selections.
D. The Magic Wand tool selects similarly colored areas.
E. The Crop tool trims images.
F. The Slice tool creates slices.
G. The Slice Select tool selects slices.
H. The Healing Brush tool paints with a sample or pattern to repair imperfections in a image.
I. The Patch tool repairs imperfections in a selected area of an image using a sample or pattern.
J. The Color Replacement tool replaces a selected color with a new color.
K. The Brush tool paints brush strokes.
L. The Pencil tool paints hard-edged strokes.
M. The Clone Stamp tool paints with a sample of an image
N. The Pattern Stamp tool paints with part of an image as a pattern.
O. The History Brush tool paints a copy of the selected state or snapshot into the current image window.
P. The Art History brush tool paints with stylized strokes that simulate the look of different paint styles, using a selected state or snapshot.
Q. The Eraser tool erases pixels and restores parts of an image to a previously saved state.
R. The Background Eraser tool erases areas to transparency by dragging.
S. The Magic Eraser tool erases solid-colored areas to transparency with a single click.
T. The gradient tools create straight-line, radial, angle, reflected, and diamond blends between colors.
U. The Paint Bucket tool fills similarly colored areas with the foreground color.
V. The Blur tool blurs hard edges in an image.
W. The Sharpen tool sharpens soft edges in an image.
X. The Smudge tool smudges data in an image.
Y. The Dodge tool lightens areas in an image.
Z. The Burn tool darkens areas in an image.
AA. The Sponge tool changes the color saturation of an area.
BB. The path selection tools make shape or segment selections showing anchor points, direction lines, and direction points.
CC. The type tools create type on an image.
DD. The type mask tools create a selection in the shape of type.
EE. The pen tools* let you draw smooth-edged paths.
FF. The Custom Shape tool makes customized shapes selected from a custom shape list.
GG. The annotation tools make notes and audio annotations that can be attached to an image.
HH. The Eyedropper tool samples colors in an image.
II. The Measure tool measures distances, locations, and angles.
JJ. The Hand tool moves an image within its window.
KK. The Zoom tool magnifies and reduces the view of an image.
LL. Foreground and Background colors
REFORMAT, ROTATE AND CROP YOUR IMAGE
 1. Open Photoshop
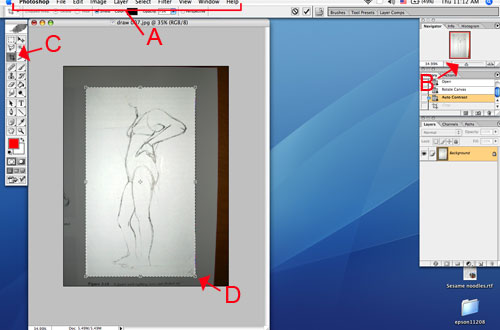
2. Open your JPEG in Photoshop by going to the Menu [FIGURE A] - to "File" - "Open with" or using the keystroke apple "O". Navigate to your image and open it.
3. Set up your workspace to have the navigator open - On the Menu [FIGURE A], go to "Window" - "Navigator". If there is already a check-mark next to it then it is already there. The navigator provides a small slider [FIGURE B] that scales your image on the screen to a workable size.
(This is preferable to using the zoom tool, since you will not have to toggle back and forth between tools, when using the navigator)
4. You may need to rotate your image to the right position (perhaps you scanned it upside down). On the Menu [FIGURE A], go to Image/Rotate Canvas and pick from the options. 180 to turn it right-side-up. 90 clockwise (CW) or counter-clockwise (CCW) to turn on its side.
5. Next you will want to use your crop tool [FIGURE C] to cut away any part of the scan that you do not want. The crop tool is located in the tool palette and looks like a square with a diagonal line through it.

8. To change the size of your image go to the Menu Bar/Image/Image Size
9. The "Image Size" dialog box will open. Depending on what you will be using the image for will depend if you will be changing the resolution. [FIGURE E] (72 is the standard dpi for any image that lives online, 300dpi is considered a standard high res. image). Next change the width of your image to fit the column of you blog (300 - 500 pixels) [FIGURE F] or for a website. If for print set it to the size paper you will be using to print with.
NOTE: It is acceptable practice to low the resolution of an image, but increasing the resolution is not. Photoshop has to literally "make-up" pixels that do not exist. NEVER WORK OF YOUR ORIGINAL, rather save a copy and work from the copy.
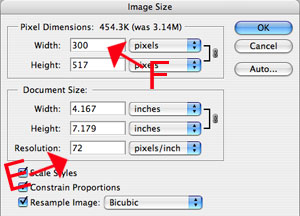
10. After the image is re-size it will look smaller on your screen. Use the slider [FIGURE B]in the navigator to bump up the image size on your screen.
SAVE FOR WEB TUTORIAL (for your blog)
To prepare your image to post on Blogger is to optimize it using the "Save for Web" option. Optimizing is a way to lower your file size while not degrading your image quality. This will save more space on your blogger account.
1. Open you image in photoshop.
2. Go to "File" - "Save for Web"
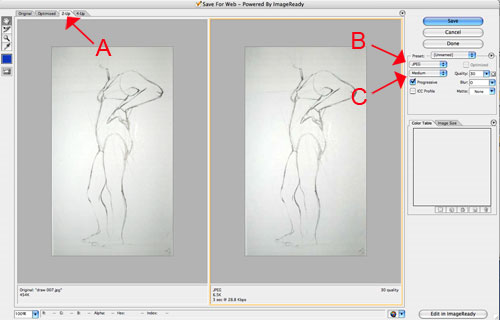
3. The "Save for Web" dialog box will open. Click on the tab "2-up" or "4-up" in the upper left hand corner [FIGURE A]. This will give you the original image on the left and the optimized version(s) on the right.
4. On the right hand size you will see some options. Use the drop-down menu on the left, to make sure you are saving your image as a "JPEG" [FIGURE B].
5. Use the next drop-down menu to choose the level of image quality [FIGURE C]. Try each option and watch how your image changes in the right hand window. Choose the image quality that is lowest, but still acceptable to your for image quality. Remember, the goal here is to obtain the lowest file size possible to save space. (Aim for around 12k if you can)
5a. If the Image is appearing larger than the window, this means you need to reduce the size of the image. On the right hand side of the the window, click the Tab: Image Size, change the size (for the blog 300-500ppi) and click Apply.
6. Looks good? SAVE!! and ReName-But remember not to use spaces in you file name. I also like to use the word "web" in it, so i know it is my web image. Save it in your images folder.
7. Post it on your weblog! (Remember when posting on the blog, choose large image (since you have already formatted it, making it smaller is unnecessary.)
DIGITAL TOOLS ASSIGNMENT 2
MANY PERSPECTIVES ON YOUR SUBJECT
The main thing you will be doing this week is to continue taking pictures of your subject and formatting the images in Photoshop, in order for them to ready to print and to upload them to your blog.
HERE IS THE ASSIGNMENT STEP BY STEP:
Photograph at least 10 separate and distinct perspectives of your subject:
Download your images to your laptop and save them to your class folder.
Imbed relevant information with each original saved image. This is handy for creating a place to add short notes about the image.
Format your images in Photoshop
Post to your blog your images.
Due Next Week:
Your 3 blog posts with images and description.
Bring to class your original images, your reformatted .psd files (atleast 6), along with your images formated for the web, all saved to your thumbdrive and uploaded to your dropsend acc.
You should have a total of atleast 42 image files.
The main thing you will be doing this week is to continue taking pictures of your subject and formatting the images in Photoshop, in order for them to ready to print and to upload them to your blog.
HERE IS THE ASSIGNMENT STEP BY STEP:
Photograph at least 10 separate and distinct perspectives of your subject:
- Begin by setting the image size in your camera to highest quality.
- If your camera allows it, set them to take TIFF's, otherwise JPEG's are fine.
- Now that you've begun to document your subject in the context of your daily life, you can know begin to pay more attention to the subject itself. For this week take pictures of the many facets of your subject. Photograph your subject from the front, the back, upside down, close up...get creative, for example you can take a photograph as if the subject was the camera's eye or tare your subject apart and photograph the inside...etc. The idea of this exercises is to broaden your habits of looking and understanding the thing you are looking at.
Download your images to your laptop and save them to your class folder.
- For this section you will need to rename your images after you download them. When they are downloaded from your camera they are assigned a number. Add to the number your name, a title and the word original. Note: It is important that your include the word "original" with your name. This way it clues you in not to edit it and you will then always have an original to return too.
- If your images are jpegs then you will also need to open the image in photoshop and resave them as tiff files: In the Menu Bar go to File/SaveAs and in the Format Window highlight tiff and click ok.
- It should look something like this: 00505091256JoeSteel_PenutShells_Original.tiff
Imbed relevant information with each original saved image. This is handy for creating a place to add short notes about the image.
- With the image file highlighted but not open goto: File/Get Info.
- Copy and Paste the relevant information in the comments section of the "Get Info" window. Note: this info does not transfer when you rename and save the file
Format your images in Photoshop
- You will be making minor adjustments to your image, such as cropping, adjusting the brightness & contrast...etc.
- You will then reduce the size of your image and saving the image as a jpeg. Follow this link: SaveForWeb function for the step by step instructions on how to do that.
- Now close your image and make sure you Rename your image and Reformat this image as a photoshop file. The suffix will be .psd. (Note: this is important to do. In the fourth week I will be asking you to submit all your work done in photoshop as photoshop files.)
- The two files should look something like this: 00505091256JoeSteel_PenutShells_increased saturation.psd
- 00505091256JoeSteel_PenutShells_increased saturation_forweb.jpeg
Post to your blog your images.
- First upload the 10 images to the post that you already created last week, which lists 10 daily events in your life. See the link: Posting Pictures on Blogger for help with this. (Remember these need to be re-formated in PS for the web too.)
- Post to your blog a description of your subject and what so far interests you about this subject
- Post to your blog 6 of your best images describing different perspectives . Write a description to go along with each of your images.
Due Next Week:
Your 3 blog posts with images and description.
- A post of the images of your 10 events from wk 1
- A description of your subject
- 6 images relating to your subject, with descriptions.
Bring to class your original images, your reformatted .psd files (atleast 6), along with your images formated for the web, all saved to your thumbdrive and uploaded to your dropsend acc.
You should have a total of atleast 42 image files.
- Folder Named Original:
- 10 original images (wk 1)
- 10 original images (wk 2)
- Folder Named For Web:
- 10 images saved for web (wk 1)
- 6 images saved for web (wk 2)
- Folder Named Photoshop Files
- 6 images saved adjustments made, saved as .psd files or tiff's.
Subscribe to:
Comments (Atom)